GitLab Geo configuration
Note: This is the documentation for installations from source. For installations using the Omnibus GitLab packages, follow the Omnibus GitLab Geo nodes configuration guide.
Note: Stages of the setup process must be completed in the documented order. Before attempting the steps in this stage, complete all prior stages.
- Install GitLab Enterprise Edition on the server that will serve as the secondary Geo node. Do not login or set up anything else in the secondary node for the moment.
- Upload the GitLab License you purchased for GitLab Enterprise Edition to unlock GitLab Geo.
-
Setup the database replication (
primary (read-write) <-> secondary (read-only)topology). - Configure SSH authorizations to use the database
- Configure GitLab to set the primary and secondary nodes.
- Follow the after setup steps.
This is the final step you need to follow in order to setup a Geo node.
You are encouraged to first read through all the steps before executing them in your testing/production environment.
Setting up GitLab
Notes:
- Do not setup any custom authentication in the secondary nodes, this will be handled by the primary node.
- Do not add anything in the secondaries Geo nodes admin area (Admin Area ➔ Geo Nodes). This is handled solely by the primary node.
After having installed GitLab Enterprise Edition in the instance that will serve as a Geo node and set up the database replication, the next steps can be summed up to:
- Replicate some required configurations between the primary and the secondaries
- Configure a second, tracking database on each secondary
- Start GitLab on the secondary node's machine
Prerequisites
This is the last step of configuring a Geo secondary node. Make sure you have followed the first two steps of the Setup instructions:
- You have already installed on the secondary server the same version of GitLab Enterprise Edition that is present on the primary server.
- You have set up the database replication.
- Your secondary node is allowed to communicate via HTTP/HTTPS with your primary node (make sure your firewall is not blocking that).
- Your nodes must have an NTP service running to synchronize the clocks. You can use different timezones, but the hour relative to UTC can't be more than 60 seconds off from each node.
- You have set up another PostgreSQL database that can store writes for the secondary. Note that this MUST be on another instance, since the primary replicated database is read-only.
Step 1. Copying the database encryption key
GitLab stores a unique encryption key in disk that we use to safely store
sensitive data in the database. Any secondary node must have the
exact same value for db_key_base as defined in the primary one.
-
SSH into the primary node and login as root:
sudo -i -
Execute the command below to display the current encryption key and copy it:
sudo -u git -H bundle exec rake geo:db:show_encryption_key RAILS_ENV=production -
SSH into the secondary node and login as root:
sudo -i -
Open the
secrets.ymlfile and change the value ofdb_key_baseto the output of the previous step:sudo -u git -H editor config/secrets.yml Save and close the file.
-
Restart GitLab for the changes to take effect:
service gitlab restart
The secondary will start automatically replicating missing data from the primary in a process known as backfill. Meanwhile, the primary node will start to notify changes to the secondary, which will act on those notifications immediately. Make sure the secondary instance is running and accessible.
Step 2. Enabling hashed storage (from GitLab 10.0)
Note: Hashed storage is in Beta. It is considered experimental and not production-ready. For the latest updates, check issue. Hashed Storage is not required to run GitLab Geo, but in some edge cases race conditions can lead to errors and Geo to break. Known issues are renaming a project multiple times in short succession, deleting a project and recreating with the same name very quickly.
Note: Instances already using hashed storage are not recommended to disable hashed storage, since bugs affecting hashed storage would continue to affect these projects.
Using hashed storage significantly improves Geo replication - project and group renames no longer require synchronization between nodes.
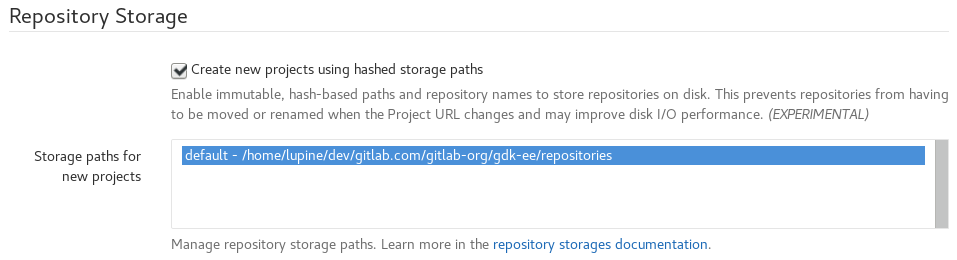
- Visit the primary node's Admin Area ➔ Settings
(
/admin/application_settings) in your browser -
In the
Repository Storagessection, checkCreate new projects using hashed storage paths:
Step 3. (Optional) Configuring the secondary to trust the primary
You can safely skip this step if your primary uses a CA-issued HTTPS certificate.
If your primary is using a self-signed certificate for HTTPS support, you will
need to add that certificate to the secondary's trust store. Retrieve the
certificate from the primary and follow your distribution's instructions for
adding it to the secondary's trust store. In Debian/Ubuntu, for example, with a
certificate file of primary.geo.example.com.crt, you would follow these steps:
sudo -i
cp primary.geo.example.com.crt /usr/local/share/ca-certificates
update-ca-certificates
Step 4. Managing the secondary GitLab node
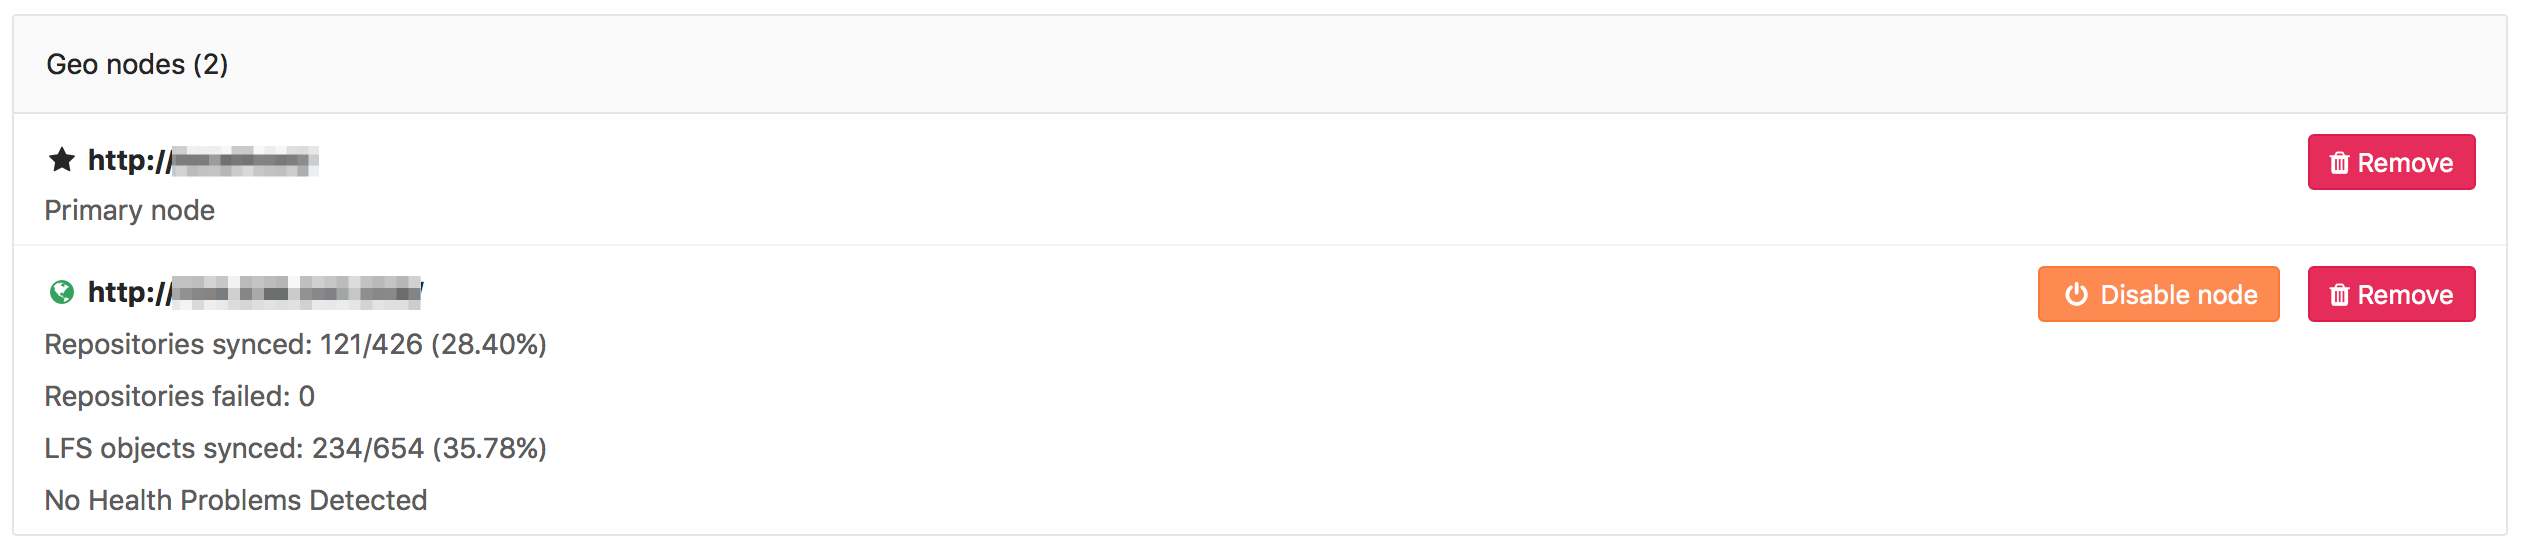
You can monitor the status of the syncing process on a secondary node
by visiting the primary node's Admin Area ➔ Geo Nodes (/admin/geo_nodes)
in your browser.
Please note that if git_data_dirs is customized on the primary for multiple
repository shards you must duplicate the same configuration on the secondary.
Disabling a secondary node stops the syncing process.
The two most obvious issues that replication can have here are:
- Database replication not working well
- Instance to instance notification not working. In that case, it can be
something of the following:
- You are using a custom certificate or custom CA (see the Troubleshooting section)
- Instance is firewalled (check your firewall rules)
Currently, this is what is synced:
- Git repositories
- Wikis
- LFS objects
- Issue, merge request, snippet and comment attachments
- User, group, and project avatars
You can monitor the status of the syncing process on a secondary node
by visiting the primary node's Admin Area ➔ Geo Nodes (/admin/geo_nodes)
in your browser.
Next steps
Your nodes should now be ready to use. You can login to the secondary node
with the same credentials as used in the primary. Visit the secondary node's
Admin Area ➔ Geo Nodes (/admin/geo_nodes) in your browser to check if it's
correctly identified as a secondary Geo node and if Geo is enabled.
If your installation isn't working properly, check the troubleshooting section.
Point your users to the after setup steps.
Selective replication
Read Selective replication.
Replicating wikis and repositories over SSH
Read Replicating wikis and repositories over SSH.
Troubleshooting
Read the troubleshooting document.